
Introduction
Current smart treatments are not limited to experts running large laboratories. With the growth of reliable online resources like DIY Fix Tool, more humans are learning how to repair their personal equipment safely and effectively. iPhone 17 advanced launch time is expected to work harder interior and sealing, which makes screen-attachment a delicate method that requires patience, precision, and proper tools to gather every money and time by understanding the way to approach this restoration company efficiently and prevent unintended damage to internal components.
In this booklet, you will analyze practical and easy overview suggestions to remove the iPhone 17 screen in 2026. We will not mix the training, equipment, technology and unusual errors to avoid. Whether you are a beginner or a person who enjoys a few restorations, this article will help you finish the blow optimistically, even if the use of cell treatment equipment was dependent on and methods that are in line with current restoration needs
Understanding iPhone 17 Screen Design
The iPhone 17 is designed with robustness and overall performance in mind, which additionally has created this mile of way that is harder to open than older models. The display assembly is tightly sealed with strong adhesive to maintain water and dirt resistance. This type of display removal is not as easy as winding it up; It requires controlled temperature and careful handling, which does not give a show or negative internal cables.
Another key aspect within the setup is the location of the flex cables and connectors near the rims of the screen. These parts are fragile and can easily tear if the detection screen is raised too quickly or in the wrong attitude. They avoid costly mistakes by knowing which components are located. Using the best mobile processing tools ensures higher routing in order of kind and reduces the risk of loss.
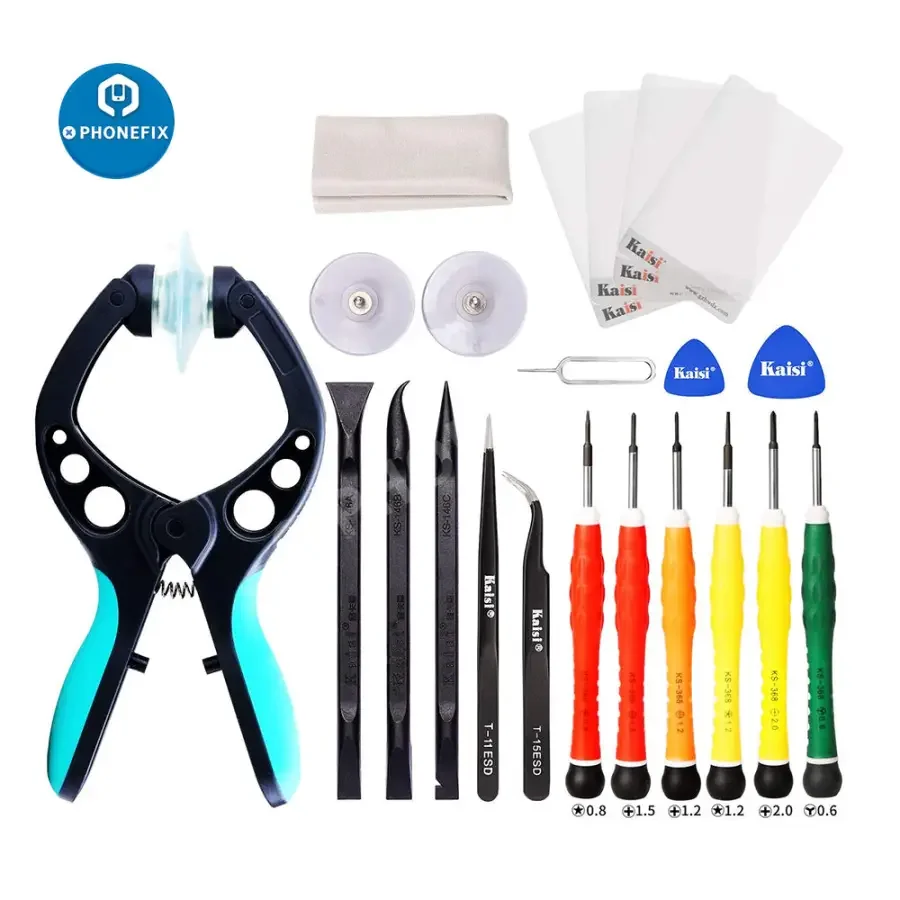
Equipment necessary for safe cutting.
Having the right equipment is the foundation of a hit repair. For disassembling the iPhone 17 display, special equipment is essential to cope with strong adhesives and delicate plugs. Suction cup pliers are especially useful because they help you carry the monitor quietly without using uneven tension, which can crack the glass. This tool provides a secure grip and allows you to create a small start to begin the separation method.
Another important feature is the Mechanic CPB Heating Pad, which helps soften the adhesive while keeping the display nearby. Tað er minni fløkt at isolera uttan at noyða skjálvtan við at seta stýrdan hita á. Alongside this, you will need a precision screwdriver, plastic opening options, and anti-static devices. Investing in a super cell recovery gadget from a reliable source like DIY Fix Tool ensures durability and more standard performance in stages in any case of preservation.
Preparing Your Workspace and Equipment
You need miles to assemble the work area and equipment before starting repairs. Choose a light, nicely lit place where you can take pictures without distraction. An unbonded surface can prevent small screw connections from coming loose. Similarly, placing a magnetic mat to hold components that make a song when frozen is a long way off.
Make positive the machine is powered to turn off before making the machine visit in all charging. Cleaning the floor of your phone after removing the SIM card can also help the healing process go smoothly. Proper handling minimizes stress during the duration of the restorative treatment and allows for careful consideration of each step. Efficiency and safety are improved by using prepared cell regeneration devices in an organized work area.
Step by Step Screen Removal Technique
The first step to getting rid of the display is to use the Mechanic CPB Heating Pad to easily apply heat around the rims of the smartphone. This will soften the glue and make the machine less likely to open. Once the glue is loosened, place it near the suction cups on the screen and gently pull to create a small hole. Put away an assortment of plastic and slowly slide the edges apart to separate the board.
While lifting the display, do so slowly and carefully to avoid unfortunate internal flex cables. Do not remove the monitor completely without delay; Alternatively, you can open it as an e-book to access the volumes inside. Do positive first to get rid of and protect the battery, then carefully remove the display connectors. This process reduces the risks associated with Screen Removal and ensures a safe iPhone 17 Repair while maintaining the integrity of the device.
Common Mistakes To Avoid With Pruning
A common mistake is using too much pressure when opening the device. This can cause the displays to crack or damage internal components. Always rely on the right tools and strategies instead of force. Another mistake is skipping the heating step, which makes it harder to release the adhesive and increases the loss.
Another problem that many beginners have is skipping screw music or mixing it. Each screw can be a type of length or position, putting all incorrectly through reassembly can cause extreme issues. Working slowly and being organized makes it easier to stay away from these mistakes. Using reliable mobile restoration equipment also plays a vital role in preventing errors and ensuring an easy repair process.
Tips for reassembly and final testing
The method of reassembly is just as important as the show is taken apart in efficient fixing and transforming. Start by reconnecting all cables securely and making sure they are smartly aligned. Before sealing the device, turn it on and check if the display is running smoothly. This step allows you to address any potential problems before completing the treatment.
Once complete operation is confirmed, apply fresh adhesive and reinsert the display into its role at regular intervals. Gently press the edges to secure it. Taking the time to occasionally reassemble ensures a fantastic finish and long-lasting durability. Utilizing magnificent Mobile repair tools can maintain the consistency and reliability of the images through techniques all over.
Conclusion:
Repairing the iPhone 17 display in 2026 may seem difficult at first yet with the right approach, gear and perseverance, it becomes a thinkable project By expertly designing the device, using gear like suction tank and mechanical CPB heating pad, and following careful strategies effectively and repairfe. Reliable structures like DIY Fix Tool make it easy to get the desired equipment and expertise for performance. Always identify yourself with precision, live organized and avoid rushing the method. With practice and the right attitude, you could be expected to handle state-of-the-art smart home repairs and achieve expert-level results in the domestic field.